Every day we offer FREE licensed software you’d have to buy otherwise.

Giveaway of the day — Focus Projects 3 Pro (Win&Mac)
Focus Projects 3 Pro (Win&Mac) was available as a giveaway on June 13, 2019!

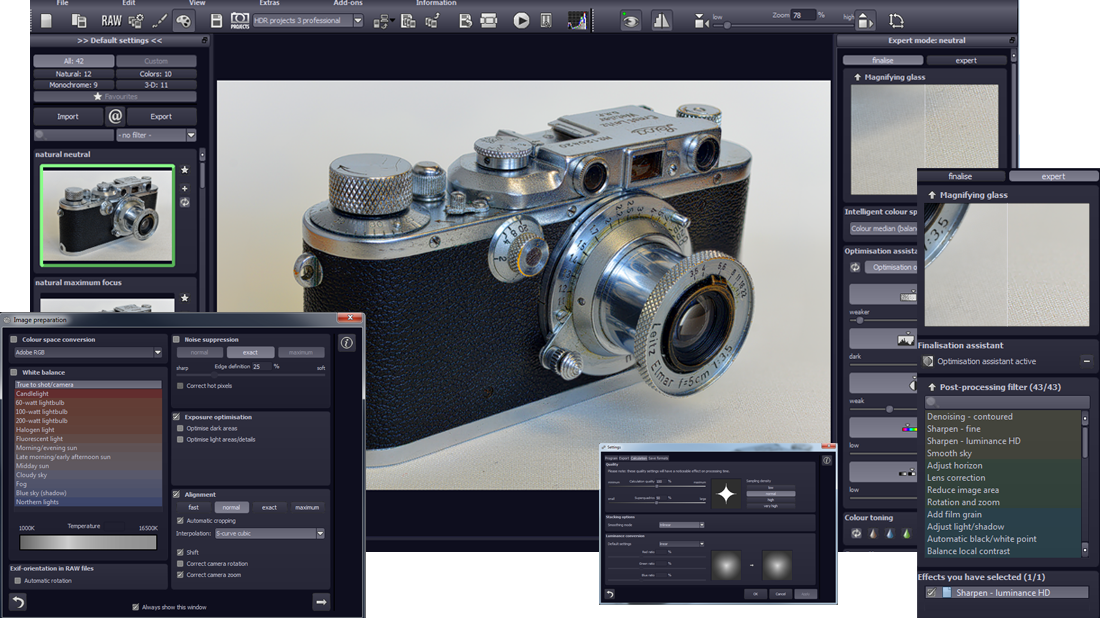
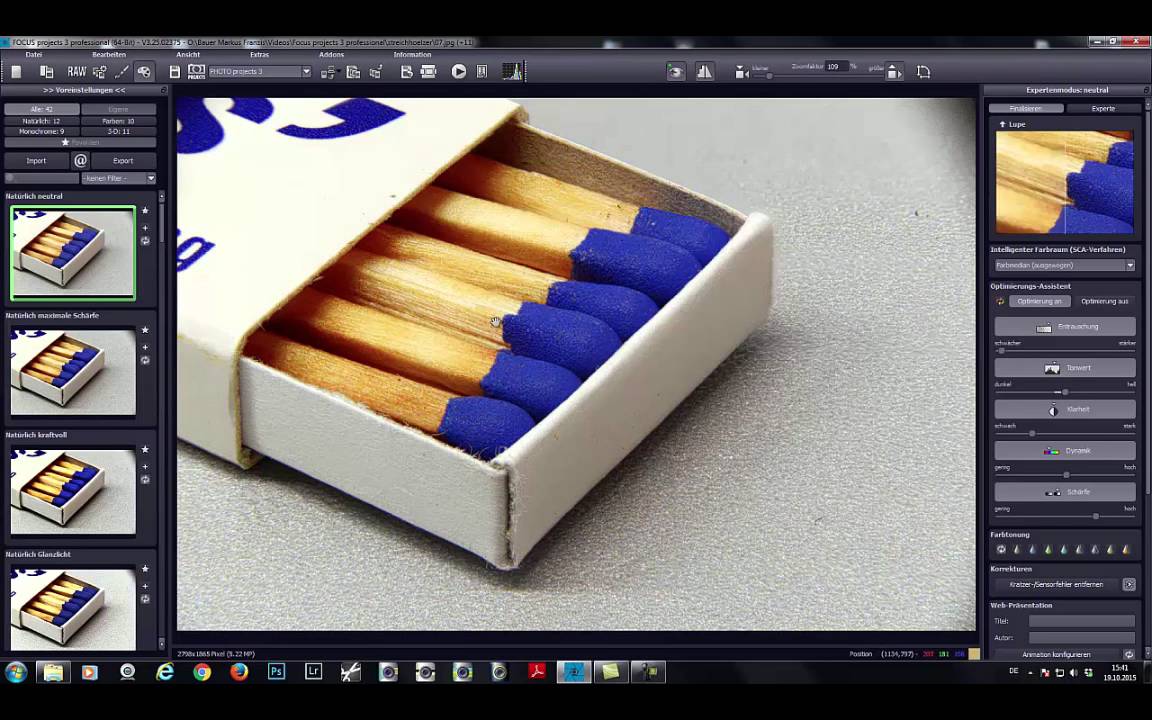
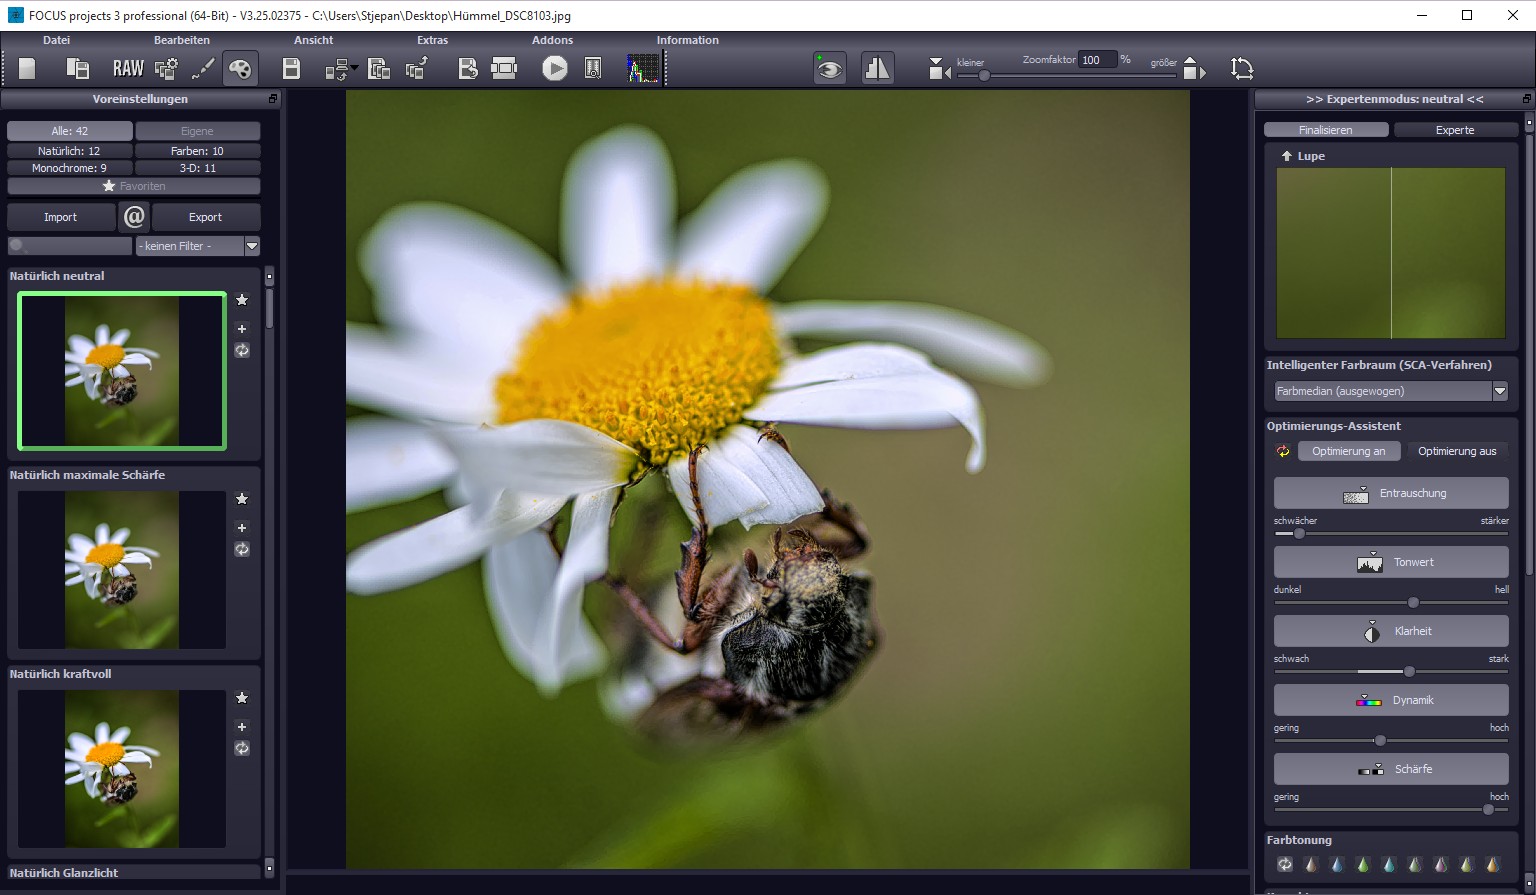
With FOCUS projects 3 professional, you can use an exposure series to create an image with fantastic depth and where even the smallest object is in crisp focus from front-to-back. The smaller the object being photographed and the lesser the distance, the narrower the area of focus is. Particularly with full-frame cameras, this field of focus can amount to less than a millimeter. The solution: FOCUS projects 3 professional!
Product video!
System Requirements:
Min. System Requirements: Windows 10/ 8/ 7, Processor Core Duo, 2 GB HDD, 1.280 x 1024 Pixels Screen Resolution, Graphic: DirectX-8-compatible, 128 MB, 32 bit color dept; Mac OS X ab 10.7, 64 Bit, Processor Intel/G5, 2 GB HDD, 1.280 x 1024 Pixels Screen Resolution
Publisher:
FRANZIS Verlag GmbHHomepage:
https://www.projects-software.com/focus/focus-projects-3-professionalFile Size:
137 MB
Price:
$89.00
GIVEAWAY download basket
Comments on Focus Projects 3 Pro (Win&Mac)
Please add a comment explaining the reason behind your vote.

Thank you so much for this great software!
Save | Cancel
Awesome software from Franzis... I have bought software from them before! This one still installs on Win XP lol, Like using the old computer for something and photography pix are one use off the Internet! Tyvm to Franzis!!!
Save | Cancel
The question about "30 days registration" relates to how long we get to use the program unless we REGISTER it. The Giveaway takes care of that; this is NOT a time-limited giveaway!
In any case, I like all my Franzis products!
Thank you to GAOTD and Franzis for this nice program.
Save | Cancel
Full program not 30 day trial.
Gotta love Franzis giveaways, yes they are always an older version, and yes they are always quality.
Save | Cancel
This isn't a trial. The program only shows as a trial if you don't follow the instructions in the read me file. If you do, it's easy to download, install and activate.
Save | Cancel
I have Focus projects 3 Pro from a giveaway in 11/16. It's a niche app where there aren't lots of alternatives, catering to those using *stacking* with their Macro photography. With stacking you take a series of macro photos, locking the focus for the 1st shot on the closest part of the subject, then with the focus still locked, move closer to the subject, so the part of the subject a tiny bit back is in focus and so on. While there are adapters that screw on like lens filters, and inexpensive lens extension tubes for macro photography, you'd want to use a real macro lens for stacking, since it's purpose is maximum sharpness. Since stacking requires physically moving the camera closer to the subject in tiny increments, you'll likely want & use a special rig to do that, and some do come motorized to automate the process. There are also cameras that can do the work for you.
en.wikipedia[.]org/wiki/Focus_stacking#In_photography
petapixel[.]com/2018/12/05/shooting-macro-photos-of-exotic-plants-using-the-nikon-d850/
If you save the email address & password for a Franzis account, getting a key for their giveaways is generally painless. Personally I like to install them in a VM, though the sandbox in win10 1903 should work nicely too, then copy the program's folder to my regular hard drive, where I run the program & activate it if/as needed. It's not that installing Franzis software is particularly messy, but rather they often include copies of the Microsoft C/C++ runtimes, and I already have plenty of duplicate copies installed, plus since the giveaways are older versions, older versions of the runtimes are included [that BTW often need updates themselves].
Save | Cancel
Misleading. Makes you think you get the program, but after registration, you find you only have a 30-day trial period of use. Very disappointing.
Save | Cancel
Mic LaMarca,
I haven't had any problems activating Franzis software over the years -- perhaps something like security software is preventing files from being written &/or altered in the user folders? Some security apps have that sort of thing as protection against ransomware.
Save | Cancel
.
[ Mic LaMarca ],
When you REGISTER at Franzis, you get an ID and code that makes this a lifetime non-expiring product in today's giveaway.
.
Save | Cancel
Mic LaMarca, Once the software has been installed, a window is displayed where you re-paste the long registration code (sent to you via email). I believe that the 30 day trial applies if you don't put the registration code in. Once I'd put in the code, the software opened and I couldn't see anything to suggest that it was only a trial version. Hope this helps.
Save | Cancel
Mic LaMarca, you seem to be the only commenter who has said the registration is good for only 30 days. Can someone else confirm that their registration will be voided after that time.
Save | Cancel
MartyToo, You have to register with Franzis and feed the licence code into the software, then it's permanent
Save | Cancel
Thank you for your many great programs which focus on Photography! Love them.
Save | Cancel
Downloaded fine, on trying to install nothing happens when I click the 'Internet' button. Windows 7 Pro, Chrome browser (no Internet Explorer).
Any suggestions?
Save | Cancel
.
[ R Osborn ],
Try resetting your display resolution to NATIVE and font size to 100%, and reboot.
Some programs can't find the display if it's set otherwise.
.
Save | Cancel
great image editing software from Franzis Germany was an amazing professional quality products I ever used. I highly recommend all photographers to use all Franzis products for photographers as they are dedicated for a specialized task to obtain great image result.
Save | Cancel
Install ok, but program will not accept activation code as ser. #
Save | Cancel
.
[ WVE ],
When you REGISTER at Franzis, you get a personal ID ( use it once during installation ) and product serial number ( use it twice, once during installation, and again at first use ).
Don't confuse the two.
.
Save | Cancel
@ricohflex
Your text on depth of field and lenses was quite accurate, but software like this goes way-way beyond that. If you wanted to photograph a daffodil flower, and fill the frame with everything in focus, none of your lenses could go anywhere near achieving that task, no matter how far you stopped it down. The technique used here is often referred to as extended focus, or extended depth of field. It's used extensively in scientific photography using a camera on a microscope, where the depth of field can be measured in fractions of a millimeter. The free program Combine ZP is an icon in this area, written by an entomologist for entomologists, but used from one side of the world to the other for photomicroscopy and anything else. The author stopped supporting the program some years back. You can still download it but it won't run under all versions of WIN 10.
Using the sort of software presented here you could not only get the front of the daffodil in focus, but everthing as far back as the waterfall on the horizon as well. You just take a series of images gradually changing the focus until you have covered the whole scene from close to far. Then the software combines only the parts in focus from every frame and presents them as onefully focussed image.
Save | Cancel
Nice easy install. You use the registration code sent in the email twice, once to start the install and the second time to register the software.
Save | Cancel
Oh and if you like it and are considering buying FOCUS projects 4 Professional subscribe to their newsletter as there are often deals. For example it was available for $39 in the 21st May newsletter vs. $99 straight from the website...
Save | Cancel
Just in case anyone doesn't get the purpose of this...
Photographic images have a limited "Depth of Field" (DoF) which is how much in front/behind where you focused is in sharp focus. This is worse for closer objects and longer lenses. While you can choose a smaller aperture to get a greater DoF, beyond a certain point diffraction softens the image (it gets worse at smaller apertures). This means you can't get all of some things sharp in a photograph.
What this software does is take a series of images which you shot while changing the focus distance a little for each one, so you have in-focus detail for the whole object (which needs not to move between shots, nor does the camera) but spread over several images. This will combine them to give the whole object in focus.
As pointed out below by dmf this was offered before, so check you don't have it already if it's the sort of thing you'd download.
Save | Cancel
Opps Run the program and use the registration code from the letter as the serial number to activate . I should have read the readme file thoroughly
Sorry for my previous post .... It is a great program
Save | Cancel
Thanks. Got the personal customer number (user ID) and the separate registration code easily. This is a software method of achieving the end result.
I expect that Photoshop CC will be able to do this too.
For photographers, there is a method to get it right (macro photo sharp from back to front) the 1st time, without the need to do post processing.
You stop down the lens aperture to get a deeper depth of field.
i.e. to F22 or to F16 if your lens does not have F22.
But the downside is diffraction because light begins to disperse or "diffract" when passing through a small opening.
The other way is to use a Tilt and Shift lens.
Canon, Nikon and other top camera manufacturers make such lenses and at different focal lengths.
For example Canon makes them at 17mm, 24mm, 50mm, 90mm 135mm.
When you tilt the lens, it increases the depth of field. Or more correctly, you can control the depth of field zone.
This is due to the Scheimpflug effect.
You can use a View Camera to achieve the same.
Large format view cameras usually have bellows and a front lens module that can tilt.
Usually the back film plane can also tilt.
Notable brands of large format view cameras include Sinar, Linhof, Horseman, Cambo, Silvestri.
Save | Cancel
.
[ ricohflex ],
Yes, photographers have a rich history of trying to sharply focus on and capture as much as possible using imperfect equipment, and learning ways to optimize their savvy use of that gear to produce the photographer's desired results.
Likewise, this software takes advantage of digital image capture's ability to take an endless series of pictures, develop them to equivalent exposure values, and then combine the most in-focus parts of each, near to far, into one final image.
In other words, this software is one more empowering enhancement photographers can employ to accomplish the presentation image they desire, just as your tips and tricks regarding aperture and tilting lenses and tilting image-planes are enhancements over "normal" straight-forward photography gear use.
This offering today is for digital image processing, not film processing, and as such, goes way beyond the limits of mechanical gear manipulation, and enters into the infinitely unlimited arena of mathematics.
__________
A note about your generalizations:
-- There is MORE diffraction at wider apertures, but there's exponentially MORE image forming light, so there is RELATIVELY less non-image forming light at the image plane than there is image-forming light.
-- At narrower apertures, there's LESS diffraction, but exponentially LESS image forming light, so there is RELATIVELY more non-image-forming light compared to less image forming light at the image plane.
-- It's the RATIO of non-image-forming light to image-forming light that matters, not the amount of non-image-forming light.
-- A tilted lens does NOT increase the depth of subject field focus, it applies the existing available depth of subject field focus across the subject and across the image capture plane more to the photographer's intentions, as well as inducing perspective distortion where the viewer of the final presentation cannot observe the presentation image from an equivalent perspective.
-- Additionally, by the way, a pinhole produces an image with subject information equally in focus near to far for subject elements larger than the pinhole.
__________
Thanks for sharing reminders of how folks used to address the challenges of producing photographic images with sharp focus over any subject field the photographer wanted.
Let us know how this software works for you compared to your other ways of capturing and preparing a presentation image with enormous depth of subject field focus.
.
Save | Cancel
ricohflex,
"I expect that Photoshop CC will be able to do this too. "
Yes -- create.adobe[.]com/2019/1/29/focus_stacking_in_ph.html
Save | Cancel
Peter Blaise, Are you confusing noise with diffraction? There's more diffraction with a smaller aperture as the Airy disk gets bigger the smaller a hole the light goes through (the colour, i.e. wavelength, of the light affects it too, but to a smaller degree). For noise there's less noise if you have less light, but it's a greater percentage of that light. Note the light level changes with ISO rather than aperture - see below (but if you have a small aperture you might need to increase the ISO if it's dark).
You always get diffraction, but when it's under 2-3 pixels wide on the sensor you don't really notice it. It also only depends on aperture, not sensor size, so smaller sensors get affected at wider apertures (due to smaller pixels).
Airy disk diameter for green light, in um:
f/1.4 = 1.78
f/2 = 2.54
f/2.8 = 3.55
f/4 = 5.08
f/5.6 = 7.11
f/8 =10.15
f/11 = 13.96
f/16 = 20.30
Example pixel sizes:
24MP crop sensor (very common) = 4 um (diffraction blur will start being an issue below f/8)
24MP FF sensor (ditto) = 6 um (diffraction blur will start being an issue below f/16)
My cell phone (note f/1.8 lens) = 1.22 um (lens is fixed aperture, so you're good)
However as you make the aperture smaller you'd, if nothing else changes, get the same amount of light as the camera will adjust the shutter speed to give a correct exposure. So if the camera said 1/500 and f/4 and you changed to f/16 you'd get 1/30th and the same amount of light. Although you will get less light if the ISO increases, perhaps as you wanted to keep the shutter speed reasonable. Not an issue here as you're using a stationary object and camera.
BTW noise averages out as the square root of the light, so:
100 photons - average noise 10, 10% is noise
10,000 photons, average noise 100 (10x as much) but only 1% is noise (1/10th as much)
The camera will add another small amount of noise, but very small in comparison.
Save | Cancel
.
[ JohnL ],
Thanks to revisiting this and expanding the discussion.
Diffraction happens when light goes over the edge of the aperture and changes direction from participating in accurate image formation, to becoming non-image-forming light.
There is more aperture edge in wider apertures, and there is less aperture edge in narrow apertures.
Therefore, there is more diffraction when using wider apertures, and less diffraction when using narrower apertures.
That's non-image-forming light.
Let's explore image-forming light.
There is way-more image forming light when using wider apertures, versus way-less image forming light when using narrower apertures.
Therefore, the non-image-forming-light from diffraction when using wider apertures is overwhelmed and not discernable on the image plane compared to the way-more image forming light reaching the image plane.
Conversely, the non-image-forming-light from diffraction when using narrower apertures overwhelms and is discernible on the image plane compared to the way-less image forming light reaching the image plane.
Yup, that's what I first said, in summary:
"... It's the RATIO of non-image-forming light to image-forming light that matters, not the amount of non-image-forming light ...".
__________
Thanks for exploring the other stuff.
But let's not think that long exposures at narrow apertures are in all ways equivalent to short exposures at wide apertures as if the same amount of light collects to produce the same ultimate total exposure, when in actuality, there are other differences with wider apertures and shorter exposures, versus narrower apertures and longer exposures.
However, your "noise = the square root of the light", or translated in approximation, "non-image-forming light = the square root of the image-forming light" explains why we can't as easily discern the greater diffraction from wider apertures on the image plane -- because there's way-more image forming light on the image plane, as I original posted.
Thanks for sharing.
.
Save | Cancel
Peter Blaise, I think I disagree and would say (well, quote): "If the opening is much larger than the light's wavelength, the bending will be almost unnoticeable. However, if the two are closer in size or equal, the amount of bending is considerable, and easily seen with the naked eye".
Do you have some handy maths on your side, I don't have anything that I'd even like to type out?
Save | Cancel
Peter Blaise, I'd say the angle of bend depends on how the wavelength of light relates to the aperture, but this probably isn't the place to keep going. Have a great day!
Save | Cancel
.
[ JohnL ],
Do you have a lens that has a 400-700 nm aperture size such that a light wave hitting one edge also hits the opposite edge of the aperture?
__________
My point is that "Airy disks" are ALWAYS there, just overwhelmed by the significantly greater image-forming light arriving through wider apertures, and those same "Airy disks" are more discernible when there is less image-forming light at narrower apertures, but those "Airy disks" are always there nonetheless.
.
Save | Cancel
.
[ JohnL ],
Editing is an art, and in context, many authors are ambiguously brief in one sentence, especially when they know that they are publishing an entire book.
Let's edit that quote to be precise:
"... If an aperture opening is much larger than any light's wavelengths, the bending of any light at the aperture's edge will be almost unnoticeable because overwhelming proportion of unbent, so to speak, light dominates our observation. However, if the aperture opening and the light wave are closer in size or equal, the amount of bending is considerable, and easily seen with the naked eye ...".
Light waves present as dimensions of 400-700 nm.
An aperture of the dimensions would be better thought of as a diffraction grating, or even a shutter.
__________
The important reason to keep these discussions going to resolution, so to speak, it to reinforce what can be expected, and what cannot be expected, from the software promises offered here at GOTD, which we can better understand if we are accurate with our understanding of the gear we use before we even present their digital product to the software begin offered.
In other words, if we misunderstand our camera gear, and misunderstand what we can control, and misunderstand how to control our digital image capture, then how can we understand and control whatever we expect form our software?
Thanks again for exploring.
.
Save | Cancel
Peter Blaise, The size of Airy disks is a well-known and trivially measurable number. They get bigger as aperture gets smaller. Ask any Astronomer, as star images really show them off (at least in good quality Telescopes). Also see the Rayleigh criterion.
Also apologies for my double posting, I thought my first post got zapped as it didn't appear yesterday and still wasn't there this morning...
Save | Cancel
.
[ John L ] ,
Let's take a 50mm lens aperture through measurements of aperture circumference, where light will be "bent", and if it hits the image plane will not contribute to the intended image, versus aperture area, where light will form the intended image:
50mm lens
f/stops _ diameter _ circumference _ area _________ ratio
13 f/1.4 __ 35.71 __ 112.20 mm _1,001.78 square mm __ 11%
12 f/2 ____ 25.00 ___ 78.54 mm __ 490.87 square mm __ 16%
11 f/2.8 __ 17.86 ___ 56.10 mm __ 250.45 square mm __ 22%
10 f/4 ____ 12.50 ___ 39.27 mm __ 122.72 square mm __ 32%
_9 f/5.6 ___ 8.93 ___ 28.05 mm ___ 62.61 square mm __ 45%
_8 f/8 _____ 6.25 ___ 19.63 mm ___ 30.68 square mm __ 64%
_7 f/11 ____ 4.55 ___ 14.28 mm ___ 16.23 square mm __ 88%
_6 f/16 ____ 3.13 ____ 9.82 mm ____ 7.67 square mm _ 128%
_5 f/22 ____ 2.27 ____ 7.14 mm ____ 4.06 square mm _ 176%
_4 f/32 ____ 1.56 ____ 4.91 mm ____ 1.92 square mm _ 256%
_3 f/45 ____ 1.11 ____ 3.49 mm ____ 0.97 square mm _ 360%
_2 f/64 ____ 0.78 ____ 2.45 mm ____ 0.48 square mm _ 512%
_1 f/90 ____ 0.56 ____ 1.75 mm ____ 0.24 square mm _ 720%
Note: I am NOT saying the % ratio is the % of diffraction on the image plane versus the image forming light, I am merely showing how severely the image forming light diminishes as the aperture narrows, way more than the edge circumference diminishes.
Diffraction happens at an aperture's edge.
- There less edge at narrower apertures,
- there's more edge at wider apertures.
- therefore, there's more diffraction at wider apertures.
Non-image forming light hitting the image plane must be proportionately significant compared to the image forming light in order to be discernible.
- There's more image forming light at wider apertures,
- there's less image forming light at narrower apertures,
- therefore diffraction is more discernible at narrower apertures.
What I first said, in summary:
"... It's the RATIO of non-image-forming light to image-forming light that matters, not the amount of non-image-forming light ...".
The "Airy disks" are always there, just not discernible at wider apertures, because they are overwhelmed by the image forming light.
.
Save | Cancel
After inserting the personal customer number (user ID)
and my registration code : the program asks me to input a serial code which is not provided in the email from Franzis Verlag . Please help.
Thank you in advance.
Save | Cancel
.
[ thomas non ],
When you REGISTER at Franzis, you get a personal ID ( use it once during installation ) and product serial number ( use it twice, once during installation, and again at first use ).
Don't confuse the two.
.
Save | Cancel
thomas non, usually with Franzis, the serial code is also the same as the registration code. Try it.
Save | Cancel